Pages

Showing posts with label 19th century. Show all posts

Friday, 30 June 2017

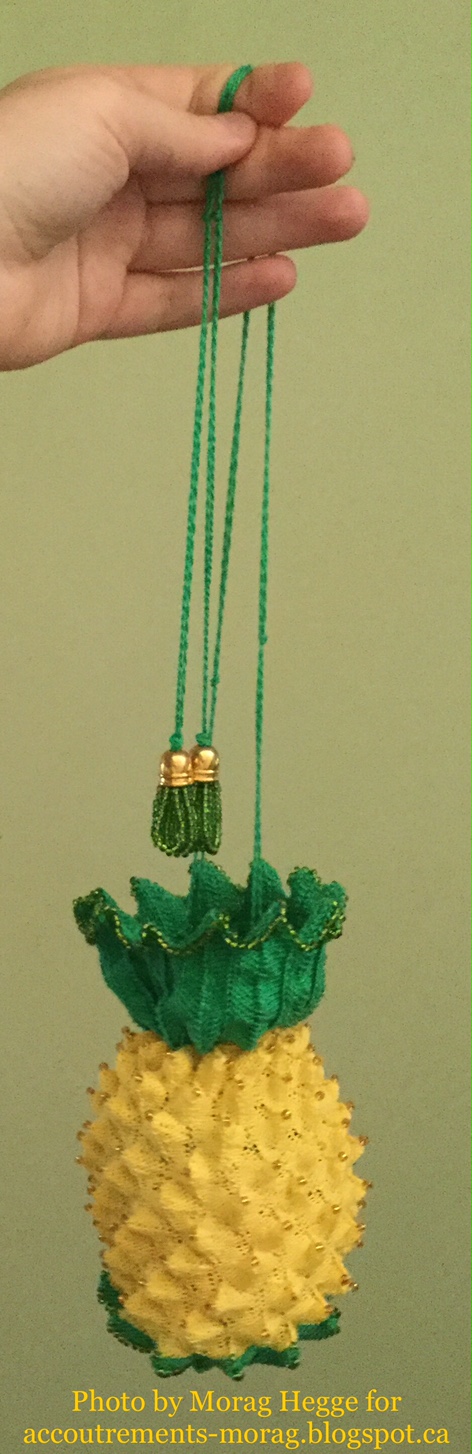
Pineapple reticule is done! Fun with beaded tassels and HSM #6

  
So I have finally completed for real my pineapple purse! It now closes and has straps! For information on the construction of the purse itself, see here


I based the look off of this example in the Kyoto Cosutme Institute's collection. The result is my own interpretation of it though. To make the straps, I wound two lengths of the green thread and doubled each one so that the two ends of thread spun in on each other- much like what is required to make a yoyo string... if you've ever had any experience with that. I then brought the cord through the stitching between the top leaves and the fruit with a darning needle. Finally I knotted several loops of beads together, and added some fun metal tassel heads.


Although it is ridiculously tiny, and I'm not sure how much fits in it, I'm excited to try it out... paired with some modern outfits as well as historical ones! :)


Now for the HSM stats:

What the item is: a knit and beaded pineapple reticule

The challenge: Metallics. The original pattern calls for gilt metal beads. Although I have used glass ones for the body instead, I did include some metal on the tassel heads. I think the glass has a metal lining inside, and gives a little more subtle look. On the whole though, I still consider it a celebration of shiny bling materials!

Materials: cotton crochet/knitting thread.

Pattern: an adaptation of Franklin Habit's modern translation of Jane Gaugain's 19th century pattern (modernized version available here) with inspiration from the Kyoto pineapple reticule as well.

Period: probably most accurate to the third quarter of the 19th century, although I will mostly be using it with early 19th century ensembles.

Notions: five 1.5 mm double pointed needles, metal tassel heads, glass beads.

How accurate is it? It is made of mercerised cotton thread, so not really accurate until the late 1840's or so (but plausible after that). However, given my budget, I thought it more closely resembled the sheen of silk than wool or some sort of less processed cotton might. Glass seed beads had been used in purses for centuries already (although until mid 19th century they appear to be mostly in completely beaded purses, as far as I can tell), although I don't know enough about the manufacture of my beads  to say whether or not these resemble 19th century glass seed beads.

Hours to complete: As usual, I completely lost track. A lot of hours... as always with fine gauge knitting!

First worn: not yet.

Total cost: about $7 cad. I didn't finish either ball of yarn, and probably even have enough for one or two more of these!

Tuesday, 30 May 2017

A green knit purse (HSM #5)

For several years now, I've been casually reading through the Workwoman's Guide. This is a wonderful book published in 1838 by an anonymous author (only known as "A Lady" on the title page), and it contains instructions for all sorts of things, from making up clothing and fabric house furnishings, and straw plaiting to household receipts. If you've ever wanted to learn "how to destroy flies" this book has got your back. There is also a section on knitting. I've always been intrigued in particular by the latter- where there are illustrations for most of the various objects in the sewing section, there are relatively few for the knitting section, and, furthermore, many of the knitting patterns have extremely vague titles (to demonstrate the full extent of this: one of the stitches it lists is actually called "The Nondescript")! And let's just say, after you get to the third or fourth pattern simply called "A Purse" you begin wondering what's actually going on in these knitting instructions. This was what brought me to try out on of the patterns- and in fact, I did start with one of the multiple purse entries! The pattern is below:

Source: A Lady. The Workwoman's Guide. London: Simpkin, Marshall & Co. 1838. Click to enlarge.
As with many early knitting pattern, basically no needle size, knitting gauge etc. specified. At least, I figured, this is a purse, so the finished size doesn't matter as much as it would for some item of clothing that actually has to fit a human being. I cast on using the instructions for the coarser gauge, using a set of 1.25 mm knitting needles, and some leftover green crochet thread from my Pineapple Purse. The resulting width actually seemed to not be all that different from the widths in dimension descriptions I had found for these purses on various museum sites, so this must be a decent gauge to work in. The Raised French stitch described here is essentially a pattern of a round of alternating decreases and open/increase stitches, followed by three rounds of plain knitting (arrgh, now I'm beginning to talk like this book!! I mean stocking stitch).

By the time I had finished knitting, I ended up with this tube with a hole in the middle. Unfortunately it's not actually as long as it should be, as I had mislaid the instructions while working on the opening and ended up knitting only half the slit length that the pattern called for.

The long green tube.

I figured this could be a form of Miser's Purse (or if it were longer maybe you could tie it up??) so I added some soldered jumprings from the jewelry store to slide the purse closed.

Now it looks like a candy!!

I got a chance to try it out this weekend at a big multiple house yardsale that happened on my street (hopefully I'll have more on that later!). It worked very well- provided that you only use coins and sort your change really well before you put it in... maybe not that useful on an everyday basis, but in a yardsale context it's decent. I also got a lot of compliments from neighbours on this funny little purse.

An action photo- my purse with money in it.

****
So now for the Historical Sew Monthly stats. The challenge: Literature.

What the item is: A knit miser's purse.

Challenge: I remembered as I was knitting this about a particular chapter in Thackeray's Vanity Fair. When I went back to the book, I realised that there is an entire chapter called "The Green Silk Purse", where Becky Sharpe and Joseph Sedley flirt while Becky knits a green silk purse during her stay at the Sedleys' family home. There's even an illustration!
W.M. Thackeray, "Mr. Joseph Entangled", 1861. 
Source: http://www.victorianweb.org/art/illustration/thackeray/4.1.html Scanned by Gerald Ajam
In this specific scene, Becky gets Joseph to help her wind her skein of purse thread onto a card.


'this arrangement left Mr. Joseph Sedley tête-à-tête with Rebecca. at the drawing-room table, where the latter was occupied in knitting a green silk purse...as he talked on, he grew quite bold, and actually had the audacity to ask Miss Rebecca for whom she was knitting the green silk purse? He was quite surprised and delighted at his own graceful familiar manner.

'“For any one who wants a purse,” replied Miss Rebecca, looking at him in the most gentle winning way. Sedley was going to make one of the most eloquent speeches possible, and had begun—“O Miss Sharp, how——” when some song which was performed in the other room came to an end, and caused him to hear his own voice so distinctly that he stopped, blushed, and blew his nose in great agitation.'

Materials: My purse is made from cotton crochet thread, rather than the silk in the book, but it was what I already had in my stash, so I figured I might as well use it.
Pattern: "For A Purse" from the Workwoman's Guide, in the section on knitting (the very top pattern on page 267).

Year: 1838. This works rather perfectly, because not only were these kind of purses used throughout the 19th century, but this is actually also a reasonable in-between date to bridge the 1810's, when this scene is set, and the 1840's, when the novel was written.

How historically accurate is it? I followed the pattern fairly precisely, and the dimensions of the purse correspond decently well to examples dated to the early 19th century on museum websites, although mine is a bit too short because I accidentally ommitted several repeats of the pattern. I also used mercerized cotton, which would not have been available yet at the time that this pattern was published.

First used: May 27th, in the local laneway yard sale.

Cost: Part of a leftover from my stash, but originally the entire ball of yarn cost $7.

Sunday, 7 May 2017

A Directoire Gown (or, The most non-committal gown of all time) (HSM #4)

 This year I helped out at the local Jane Austen festival, and I decided for the ball that it would be nice to have some kind of ballgown. I went to my stash and found a pretty turquoise gauze that I had gotten a couple of years ago from one of my neighbours in a yardsale. As I was thinking over what design to use, it occurred to me that I'm generally extremely uncomfortable with wearing clothing with the Empire silhouette, even though I've been attending events with the local Regency group for years (I always end up skirting around the period*puns*-, which is why I've made a bunch of 1780's/90's garments and an 1820's/30's style gown but nothing in between). I decided then, with this dress, to commit to as little cutting as possible- I loved the fabric and didn't want to see it go to waste if I ended up disliking it (although as it turned out, this was not a concern at all!).

This got me thinking of what specific part of the 1800-1820 time period would be easiest to create with minimal cutting. I decided on a neoclassical/very early 19th century- inspired design. I figured a neoclassical look would be the best to minimize cutting given that the focus was more on drapery than a tailored look. In fact, the ancient garments from which the early 19th century drew inspiration were often made up of more or less complete lengths of fabric woven to size, and, when cut, were made with little to no waste fabric.*

*I think there may be an interesting discussion of this in Dorothy Burnham's Cut my Cote, which explores the history of clothing cut to loom widths in various cultures (and has DIAGRAMS!). I can't remember if there was any mention of Classical Antiquity in it, but a very good book either way.

Wednesday, 19 April 2017

Spring is here... and a pineapple to celebrate!

It finally looks like spring is here to stay (here's hoping... you never know). Assuming spring has come for good, here's a fun warm weather-y project I've been working on lately:


The pattern for this tiny little purse is a combination of the instructions from Franklin Habit's and Isabel Gancedo's patterns,* both of which are based off an 1840's pattern from Gaugain's The Lady's Assistant (1840). It was surprisingly simple to make, and I just love the strange texture of the whole purse.


ALL the pineapple spikes!!

The thread was a size 16 crochet cotton with 1.5mm (I think) needles- I should maybe have made the gauge a little tighter in the body though. I added glass seed beads in coordinating colours where the pattern called for beading. I'm not sure whether or not I'll line it, but I'm making up the drawstring now, and I think I'll leave any considerations of lining until after that's finished.

And look at the inside as well! I find this pattern so neat!

*If you are a fan of Ravelry, both patterns can be found there as well.

Thursday, 13 April 2017

A modified Regency brisé fan (HSM #2)

I actually hope to put up documentation and a tutorial for this soon enough (and I know the post is pretty late already). Anyway, here it is.

Challenge/What the item is: A Regency/ Empire brisé fan. It was a simple sandalwood fan that I re-shaped (filed down/sanded and sawed- hence the scalloped edges) and re-strung (replaced the plastic thread with silk) to give it a more early 19th century look.

Material: sandalwood, metal rivet pin (already part of fan), silk thread (my addition)

Year: 1800- 1815

Notions: Silk thread, wax for thread, Sandpaper (both coarse and fine)

How historically accurate is it? I tried to give the edges a scalloped shape similar to photos I've seen of extant fans, and cut off part of the bottom to make the bottom of the fan end closer to the pin. Most of the examples I saw while researching this made of ivory or horn, rather than wood, and had ribbon to hold them together rather then thread (the slats are so thin though that I didn't want to risk ruining them by carving larger holes in them. Although the angle of opening of the fan is ok for this time (as far as I know...) if I were handier with rivets I'd also take out some slats and make the fan opening angle more acute.

Hours to complete: Estimating 5, including time for figuring out how to do it.

First worn: Not yet.

Total cost: Fan= $1.25 CAD + a small amount of silk thread already in stash.

Wednesday, 17 February 2016

19th century blue gown: HSM Challenge #2


I originally made this gown to wear when I volunteered as a docent at a small museum. I never fully finished some of the details on the gown (particularly those sleeves) and it has sat as a sad UFO in my closet for over a year now. Sit no longer, gown! Your time has come!


Challenge: Pleats and tucks. The tucks are on the bottom of the skirt, and the pleats at the top! I admit, this is far from the most creative way of incorporating either into a garment, but hey, it's got both, so why not?

Material: An old cotton duvet cover, cord for piping, hooks and bars, cotton thread, and some scrap canvas and other white cotton from my stash (I think this also started life as an item of bed-clothing... maybe I've got a pattern here).

Pattern: S&S Romantic Era Day Dress (with modifications)

Period: mid to late 19th century

How historically accurate is it?
The museum I volunteered at was originally a toll-keeper's cottage. It was located on the outskirts of the city of Toronto, on one of the many toll roads that led into the city. The cottage served as a home the toll-keepers and their families from the 1830's to the late 1890's.There isn't much information available on clothing worn by rural workers living on the outskirts of 1860's Toronto (in Upper Canada), and I'm still not sure if this is an accurate representation of something of the sort (maybe the info's out there somewhere, but if it is, I couldn't find it- if anyone could point me to anything, I'd be very grateful!).

As far as construction goes, it's reasonably accurate- I'd give it maybe an 75 % given that the the 19th century isn't really my strong suit (ha puns!) historical sewing-wise. It was an entirely new era for me. I sewed it entirely by hand, I fudged some inside details, like lining the inside of the bodice with the same blue fabric as the outside. I also didn't hang the skirt from the bodice (which would be probably more accurate), but enclosed it in the waistband instead. The sleeves aren't actually the classic 1860's two-piece sleeves- I drew the single pattern shape here and had to reset and piece it a million times to make it work. All I can say is that at least they actually fit me now!

Hours to complete: About three days straight of sewing over a year ago!! Plus a few hours this month to finally finish up the sleeves.

First worn complete: Yesterday while doing finishing touches, to see if it fits. I last wore it in its incomplete form on Canada day (July 1st) last year while doing a shift at the museum's promotional table in a local festival.

Total cost: For the materials, about $3.75- this was for the half a pack of skirt hooks and the piping cord. Everything else I had around already.